
Class Session: Wednesday Jan 17, 2018
Basics: Clients
Class is cancelled due to Adverse Weather. Your opal accounts are all ready. Try to follow the task instructions on this page and get these tasks done on your own before next Monday's class. On Monday I will be in the classroom, or just outside of the classroom, at 2:00 p.m., if anyone needs help. If you need help or have any questions, before then, email me, and I will get back to you. These tasks will be easy for some of you and not so easy for some of you. Don't get discouraged, or frustrated, if you can't get it done by yourself.
Even though all tasks will be graded at the end of this session, please submit your class intake form as soon as possible. I want to know who has macs or pcs.
Throughout the course, don't forget about making blog posts or other parts of your Value Added grade component. Your first blog post is your introduction. Your second is something you have learned from one of your newsletters. Your starter will be based on your second blog post or one of your later blog posts. Later blog posts don't have to be related to the newsletters, but they can be. (You only need to do one starter this semester.)
Preparations for this session
on clients
- How Operating Systems Work by Dave Coustan and Curt Franklin, How Stuff Works. Look especially at the distinction between single-user, multi-tasking and multi-user operating systems
- Introduction to Client Server Networks by Bradley Mitchell, About.com
you might also glance at
- How Laptops Work by by Tracy V. Wilson and Robert Valdes, How Stuff Work
on Open Source
- read What does open source mean? in How Stuff Works. This is part of our discussion of operating systems
An introductory class presentation I did not have time to show last class.
Clients and Servers
In this session we will discuss the differences between clients and servers.
Task 01.04 Set up SFTP Client
The most common transaction that a web designer will have with a web server is the uploading of HTML documents, graphics, and other media files. Files are transferred between computers over a network via a method called SFTP (Secure File Transfer Protocol).
If you are using Windows, use UNC Shareware to obtain SSH/SFTP Secure Shell Client.
After you have downloaded and installed it,
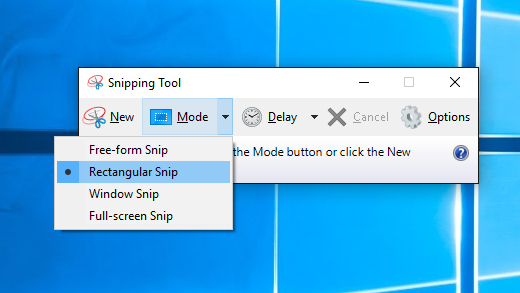
take a screenshot of your programs files to show me that you have it.
Remember that you can take a screenshot by using the Snipping Tool's rectangular snip and
dragging your cursor over the area you wish to select.
But hold on to the image.
You will use your SFTP tool to store the image in the tasks directory you will create in Task 01.05.
This will require you to paste the screenshot into some application that you can manage it.
For Mac Users, if you wish to use Fetch, download it through UNC Shareware so you can unlock it with the UNC license.
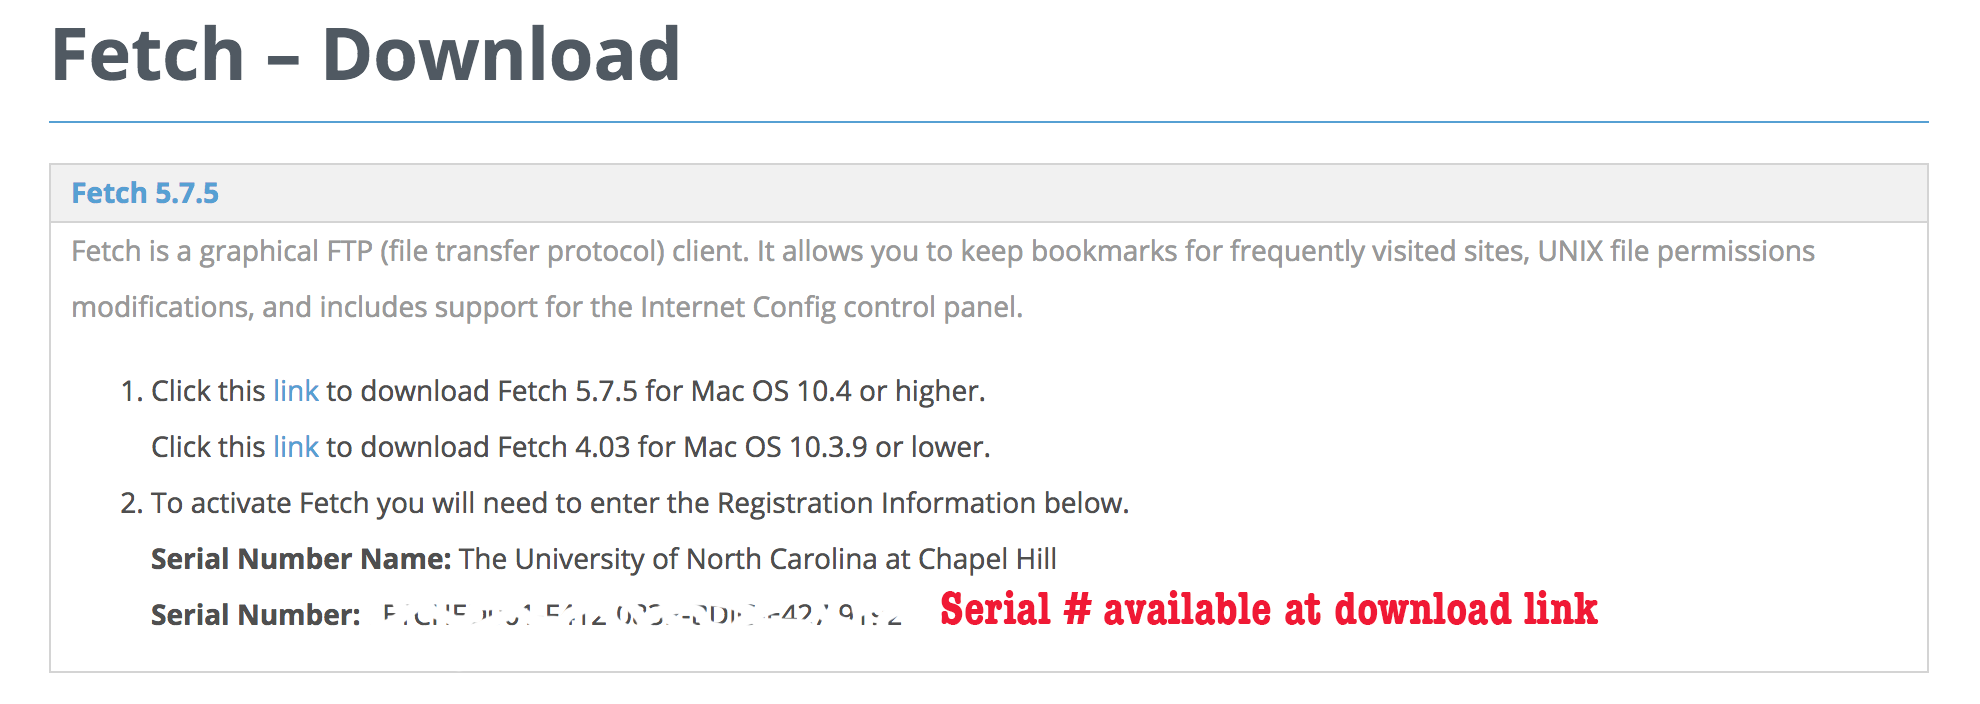
Personally, I prefer Fetch over Firezilla, Cyberduck or any other free option. (Fetch is not really freeware, but UNC has a license, so it is free for students and faculty. Make sure you copy and paste the Serial number name and serial number license to get rid of the nag feature that will keep reminding you pay the license fee.
I use Coda2, for my professional work, but, it costs $99 (Mac Only).
If you don't like Fetch, feel free to download whatever Mac SFTP client you prefer. FileZilla is compatible with Windows, Mac, and Linux operating systems. If you install the default option, it will change your browser start items and mess with other settings, so don't just click mindlessly when you are installing.
If you use Firefox You may want to try Waterfox as an Internet browser,
as it can use the FireFTP plugin that is now no longer compatible with Firefox.
FireFTP allows you to make SFTP transfers from within the Waterfox browser window.
The developer of Fire FTP has moved his plugin compatibility to an Open Source Mozilla Browser called Waterfox. Firefox dropped support for FireFTP. If you navigate to FireFTP with Firefox, you can’t install it anymore. I downloaded Waterfox, then installed FireFTP, and gave it a try. (When you install FireFTP, it says it is installing to Firefox, but is is not; it is installing to Waterfox.) I was able to connect to my OPAL account, but I could not connect if I saved the password in the connection dialog box. You must leave that field empty. Click connect, then let it prompt for the password.
DISCLAIMER: THERE IS MALWARE PRETENDING TO BE CYBERDUCK! Also, the legitimate Cyberduck may install annoying adware on your system, so be careful with this one.
Cyberduck is particularly user-friendly although there are many other (free) Mac-specific SFTP tools out there.After you have downloaded and installed it, take a screenshot of your programs files to show me that you have it. Remember that you can take a screenshot by holding Command+Shift+4 and dragging your cursor over the area you wish to select.
To login to OPAL with PC SSH client:
You need to be on eduroam to login on campus, and you need to have VPN and DUO installed to log in, if you don’t have access to eduroam.
- Start your SSH terminal application.
- Select "Quick Connect", then enter opal.ils.unc.edu in the dialog box and enter your onyen.
- Accept and Save the host key, if requested. (This is the encryption key that lets ITS identify you).
- You will be prompted for your username (ONYEN) & password; provide them.
- Once there, you are in a shell session and thus into UNIX. The
$is the LINUX prompt.
To login to OPAL WITH Macintosh Terminal App:
You need to be on eduroam to login on campus, and you need to have VPN and DUO installed to log in, if you don’t have access to eduroam.
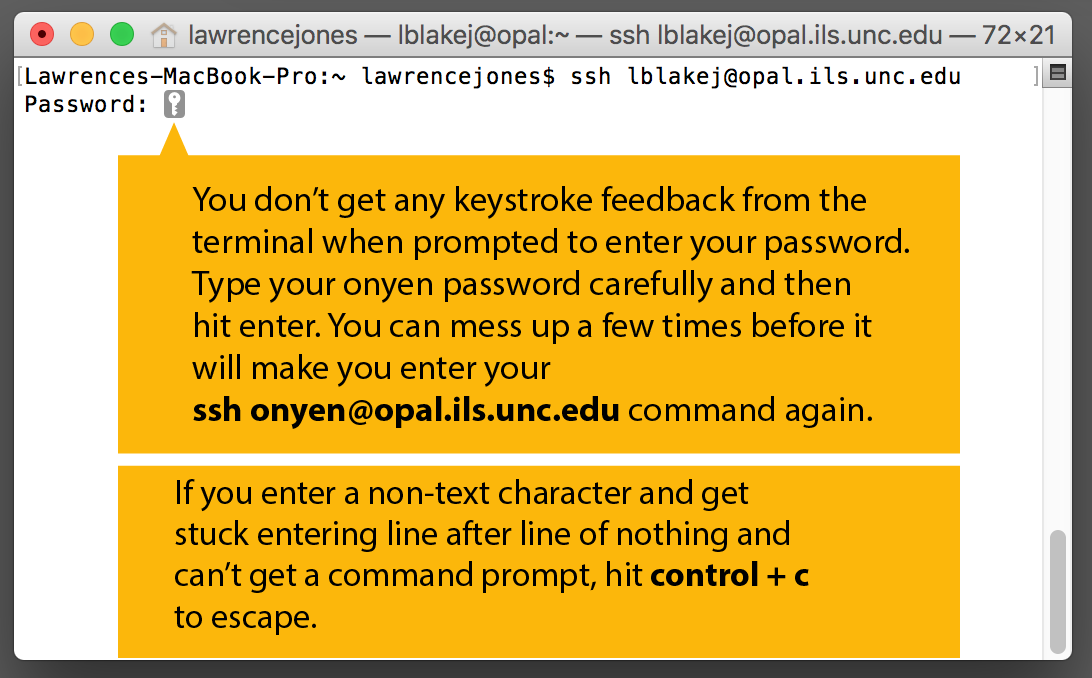
The terminal password prompt does not give you feedback. You just have to type carefully and hit enter. If you mess up, it will give you a few more chances to get in. If you make a lot of mistakes, it will make you put in the ssh command again.
- Hit command spacebar to launch Spotlight Search
- Start Typing "Terminal" hit enter when it pops into search window
- type
ssh *onyen@opal.ils.unc.edu then <enter>- *Replace
onyenand put in youronyen. - Example:
ssh smithj@opal.ils.unc.edu
- *Replace
- Accept and Save the host key, if requested. (This is the encryption key that lets ITS identify you).
- You will be prompted for your ONYEN password. Enter the password at the prompt, which might be a key or a dot or a rectangle or a
$.
Naming Conventions for your Projects to be Posted in your Protected Directory
I want you to use the following specific naming conventions for your document, spreadsheet, access, and powerpoint files:
01-alertbox.png
01-sftp.png
01-techreview.png
01-vpn.png
03-jones.lawrence.docx 		# Word Document
04-jones.lawrence.xlsx 		# Excel document
05-jones.lawrence.accdb	 	# Access document
06-jones.lawrence.pptx 		# Powerpoint document
If you name your .docx after your book, like
The Story of Young Abraham Lincoln.docx
and everyone else does the same for their particular title, then when I pull them all down to my computer to grade, I will have 32 different book titles in a folder on my desktop and I have no idea which one belongs to each one of you.
Task 01.05
Password Protect a Directory
Use a terminal connection and command line instructions to create a password protected directory
Log on to your Opal account using a terminal connection program and enter a temporary shell session at the command prompt (it should be $ in Unix).
Change to your public_html directory.
cd public_html
Create a new subdirectory within public_html to password protect
mkdir tasks
The new directory doesn't have to be named "tasks", but you should get into the habit of using consistent and logical directory and file names.
Be careful not to inadvertently password-protect your public_html directory.
Use
pwd
to see where you are. If you are not in your new directory, use
cd tasksto go to it.
Once you are sure where you are, type
htdirpass.pl
and hit Enter. This will activate a script that automatically creates several files for you.
Verify that you are in the directory you want to protect and follow the instructions on the screen.
The program creates two files in the directory you are protecting: .htaccess and .htpasswd
You won't see these files on a regular ls command, you must type
ls -a.
Don't delete the files unless you want to remove the password protection.
Send me an email telling me the name of your password protected directory
It will probably be something like ~YourOnyen/tasksor ~YourOnyen/my-files
Also, be sure to tell me the userid and password I must use to access this directory.
This will be the place you will store all future tasks and Tasks.
Setting File Access Permissions
Before you (or anyone else) can view your files in a web browser, you must change the access permissions for your home directory on opal. If these permissions are set incorrectly, anyone trying to view your webpage will see a Forbidden error rather than your content. Follow these instructions to set the correct permissions:
Open an SSH connection to Opal.
On Windows, you'll need to use an SSH client for this; on MacOS and Linux, you can open a Terminal window, enter
ssh your_onyen@opal.ils.unc.edu
and then enter your password when prompted.
Once you've connected, you should see a command prompt like this:
[your_onyen@opal ~] $
Type
chmod 711 .
with both the space and the period. If you get a "missing operand" error, make sure you included the space and the period at the end.
Password-Protecting Your Webpage
If you'd like, you can require users to log in with an Onyen to view your webpages. To configure Onyen authentication for your opal.ils.unc.edu web space, follow the instructions in the ONYEN-AUTHENTICATION.txt file inside your home directory.
Viewing Your Webpage
After you have uploaded your files and set the correct permissions, your webpage will be viewable at https://opal.ils.unc.edu/~onyen/ . This will take you to the index page in your public_html folder; you can also navigate directly to other pages or subfolders you've added, such as https://opal.ils.unc.edu/~onyen/my_folder/my_page.html
Generally speaking, within a network, clients are computers and devices that request data from a server. Clients initiate and servers wait and respond.
Theoretically, any device connected to any network can be configured to operate as a client or server. For example, here is an article from 2009, describing how an iPhone can be used as a Web server. However, that is not very practical for any serious resource needs. So, the distinction to what constitutes a client or a server is governed most of all by practicality. Servers, in general, are setup to provide services to other servers and clients. Network administrators have a tricky job setting up resources. Too few resources will result in poor or no service and too much investment translates into wasted costs. In this course the lab computers, your laptops and your handheld devices will operate as clients.
| Client Definition | Webopedia |
| How Laptops Work | How Stuff Works |
| Server Definition | Webopedia |
| How Web Servers Work | How Stuff Works |
| How PCs Work | How Stuff Works |
| Microprocessors | How Stuff Works |
| Wireless and Wifi Coverage | UNC ITS |
| Windows Maintenance | Lifehacker |