06 Sep 2018
Class Schedule
21 Aug | intro
23 Aug | clients
28 Aug | servers
30 Aug | networks
04 Sep | basics lab
06 Sep | HTML - practice |
theory |
tags |
links |
HTML terms |
02.01 |
next session
11 Sep | presentational layer
18 Sep | working with layers
20 Sep | behavior layer
25 Sep | images & design
27 Sep | website lab
02 Oct | object layers
04 Oct | tools that read markup
09 Oct | document markup lab
11 Oct | spreadsheets, formulas & functions
16 Oct | data display
18 Oct | Fall Break
23 Oct | database tools
25 Oct | spreadsheets lab
30 Oct | relational databases
01 Nov | tables
06 Nov | relationships
08 Nov | input & output
13 Nov | SQL
15 Nov | complex queries
20 Nov | databases lab
22 Nov | Thanksgiving
27 Nov | presentation design
29 Nov | presentation delivery
04 Dec | presentation lab
13 Dec | 0800-1100 | final in class presentation

This work
is licensed under a
Creative Commons Attribution-NonCommercial-ShareAlike 3.0 Unported License.
home & schedule | class blog | syllabus | contact | grades
In the HTML syntax, most elements are written with a start tag and an end tag,
with the content in between.
An HTML tag is composed of the name of the element, surrounded by angle brackets.
An end tag also has a slash after the opening angle bracket, to distinguish it from the start tag.
Remember ...
<tagname> content </tagname>
<p>This is a paragraph</p>
This is a paragraph
HTML tags follow the same logic as did UNIX/LINUX commands.
| UNIX/LINUX ⇒ | command | argument | value |
| HTML ⇒ | tag | attribute | value |
Working with UNIX/LINUX at the command line
requires us to know certain exact commands.
Working with HTML in the hard code
requires us to know certain exact tags.
We want to become comfortable with the fact that just as some
UNIX/LINUX commands
require an argument to effectively
carry out the command,
so some
HTML tags
require an attribute to effectively
carry out the tag.
Sometimes the attribute will include a specific
value that must be appended to the
attribute in order to carry out the
tag.
back to top
Block and inline elements
A block-level element always starts on a new line and takes up the full width available (stretches out to the left and right as far as it can).
Some examples of block level elements include
<div> a division or a section
<p> paragraph
<hn> headings
<ul> unordered and <ol> ordered lists
<li> list items
An inline element does not start on a new line and only takes up as much width as necessary.
Some examples of inline elements include
<a> anchor
<b> bold or <strong> strong
<i> italics or <em> emphasis
<img> image
<span> is used to group inline-elements in a document
back to top
Headings
Tags for headings are of the style <hn> where n is replaced by a numeral between 1 and 6. The first pages we created use a Heading 1 for your name. Take a look at the code and how it displays.
<h1 style="text-align:center"> Your Name </h1>
Your Name
All of our pages use heading tags to identify different parts of the page
We seldom use a Heading 1
The title of each card in the DIV to the left of each class page is a Heading 2
The title of each card in the DIV to the right of each class page is a Heading 3
while card subheadings are Heading 4
The tags tell the browser to display the text between the opening tags
<h1, h2, or h3 respectively>
and the closing tags
</h1, /h2, or /h3 respectively>
in the manner that the particular browser
chooses to display a Heading 1, a Heading 2, or a Heading 3
Sometimes we add a class attribute to a heading
back to top
Lists (this element, by the way, is a Heading 3)
Unordered Lists (this element, by the way, is a Heading 4)
The basic list in HTML is the unordered list. The following shows the usage of list tags.
<ul> - the start tag
<li> - the tag for each item in the list,
followed by the end tag </li>
<li> - another list item
</li>
<li> - yet another
</li>
</ul> - the end tag
Ordered Lists
-
Ordered lists are the same except
"ul"
(unordered) is replaced with
"ol"
(ordered).
- Lists can be nested within lists.
- Look at the code on lines 343-356.
- We just nested two unordered list items within list item number one in an ordered list consisting of two list items, 1 and 2
back to top
Paragraph and line breaks
<p>
- the tag for paragraph enters more vertical space than line breaks.
Remember to end a <p>
with a </p>.
<br />
- the tag for line breaks
returns to the following line and resumes there.
There's more to ending the break tag, however.
Read on.
back to top
Empty elements
Some elements are simply directives and have no content and are their tags are thus handled differently from elements that have content.
For example, horizontal rules are created using the <hr> tag. The horizontal rule is is an empty element because it provides a simple directive - <insert a horizontal line> - and has no content. Since an empty element does not require an end tag, but the XHTML standard requires one, the convention for empty element tags is to follow the tag with a blank space and a slash to indicate that the tag both opens and closes this element.
Accordingly, the correct horizontal rule tag would read <hr />.
The same is true for other empty elements
- <area />
- <base />
- <basefont />
- <br />
- <col />
- <frame />
- <img />
- <input />
- <isindex />
- <link />
- <meta />
- <param />
back to top
There's a difference between block and inline grouping tags
block
The <div> element allows you to group a set of elements into one block-level box. The browser will start each <div> element on a new line, but you can specify exactly how each <div> element should behave with presentational rules specific to each <div> element.
Reveal the code on this web page to see the <div> elements in use here.
inline
The <span> element acts as an inline equivalent of a <div> .
The <span> element is used to set off a section of text from its surrounding text.
... set off <spanstyle="color:#F65314">a section of text</span> from its surrounding text.
back to top
There's a difference between structural and semantic markup
There are some text elements that are not intended to affect the structure of your web pages, but they do add extra information to the pages - they are known as semantic markup.
Examples include
<em> which allows you to indicate where emphasis should be placed on selected words;
Browsers often display <em> as italics
<blockquote> which which indicates that the block of text is a quotation.
Browsers tend to indent the contents of the <blockquote>
Other examples include
<abbr> for abbreviations
<cite> for marking a citation
<address> to contain contact details for an individual
back to top
So let's try some - this is task 02.01
Let's start with a new web page. Using a text editor of your choice (for example, using Notepad++ in the Windows O/S, or, if you're using a Mac, in Brackets). create a basic page by typing in the code for a basic, well-formed page and save it to the same folder where you saved your original page. It is the very basic code needed to display a page. Note that it is just text at the present. If we want to display it in a browser, we have to save it again with a .htm (or .html) file extension. Go ahead and do it, then open the saved page in your favorite browser. We will make changes to the code using a your preferred text editor, and view our efforts in the browser.
Either type the following changes into the body of your index01.html file or copy and paste. The new tags, specifying ordered and unordered lists are indicated their tags (<ol> and (<ul> respectively). You can also add a style attribute with a value that will center the name on your page.
<h1 style="text-align:center">Your Name</h1>
<p>
This web site is divided into a minimum of three areas,
with a minimum of one of the areas having subordinate pages as well.
Specifically, the areas are
</p>
<ol>
<li>
About me.
This area may have subordinate pages for a fuller Curriculum Vitae or
a résumé.
</li>
<li>
Classes.
This area will have subordinate pages for four tasks due
as part of INLS161 [enter section number and current semester here]
<ul>
<li>Markup</li>
<li>Spreadsheets</li>
<li>Relational Databases</li>
<li>Presentational Graphics</li>
</ul>
</li>
<li>
Interests. This area may have subordinate pages for fuller explorations of personal interests. </li>
</ol>
<p>last updated on [current date]</p>
So, we now have a new page that includes both bulleted and numbered lists. It might look like this:
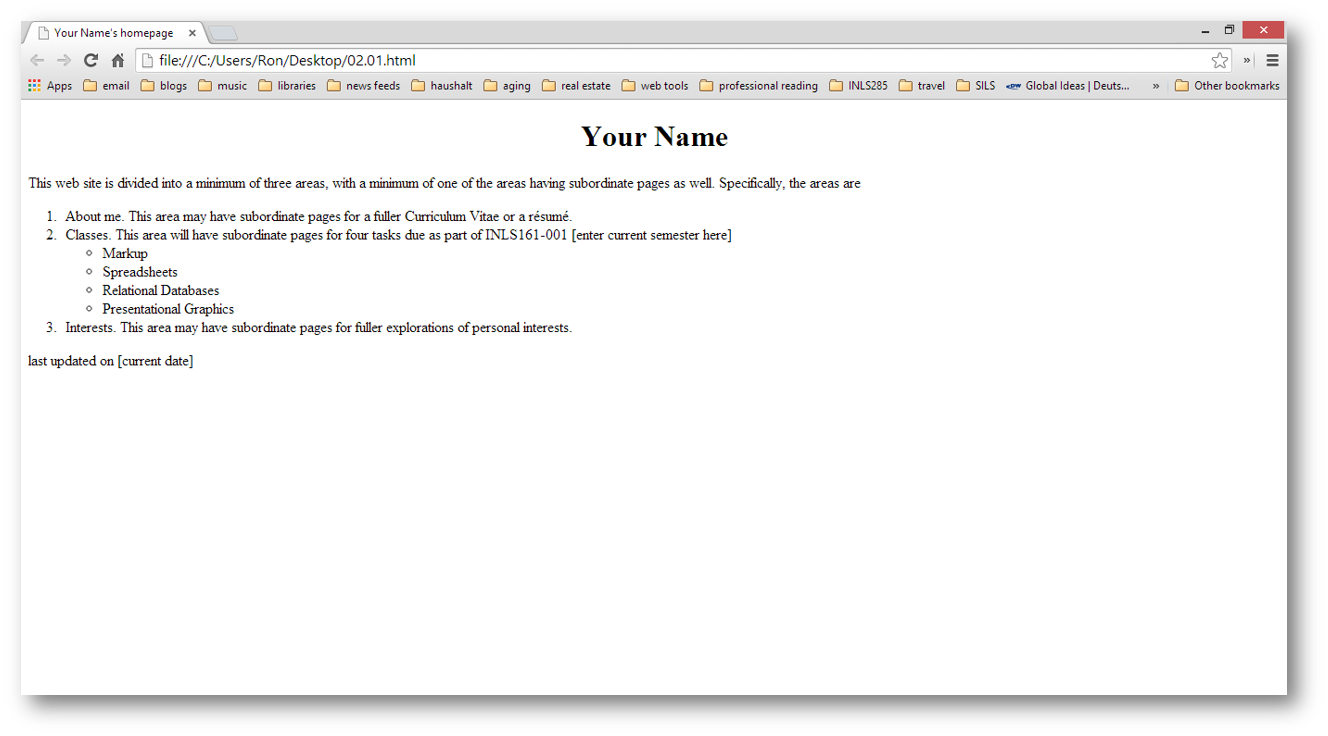
Not bad. Later we'll link items in the lists to other pages both on- and off-site.
Note how we embedded an unordered list within an ordered list by using the relevant opening and closing list tags.
Now you need to personalize this page for yourself by adding in your name between the H1 tags and modifying the Title tag in the page head to fit your needs
After you have personalized it for yourself, place this page in your public_html space by 2359 on the evening preceding the next class session, and tell me to look at it via an email which gives me the URL to use.
back to top
HTML - practice | theory | tags | links | HTML terms | 02.01 | next session