
Session Date: Wednesday Aug 30, 2017
Basics: Servers
Be sure to bring your laptop to this session.
Preparation for this Session

on servers
- How Web Servers Work by Marshall Brain, How Stuff Works
- In Web Design in a Nutshell , 3rd Edition, read parts of chapter 4, "A Beginner's Guide to the Server" Unix Directory Structures, p. 46 through File Naming Conventions, p. 50
glance over
- Unix/Linux: Getting Started by UNC-CH ITS
- In SAMS Teach Yourself Unix in 24 Hours, Fourth Edition, read chapter 1, What Is This Unix Stuff?, p. 1 through Getting Help, p. 4
Where We Left off last class...
In our last class you should have setup your Carolina CloudApp and set up your two repositories. Here are quicklinks to your console and Source Control:
- Console: https://console.cloudapps.unc.edu/console/
- Source Control: https://sc.unc.edu/
Task 1.6
SHH Key Setup on Carolina CloudApps
I want you to first do this from the class computers; they do not need a VPN and Git is already installed. Also, I want you to be familiar with using Git on the class computer in case you are not able to get to class with your laptop.
If, for some reason, you are dealing with an emergency,and you miss this session, or if you are adding this class towards the end of drop add, you can do it from your laptop.
The two following prerequisites will apply in that case:
-
If you are off campus, you will need to have installed VPN on your laptop
-
you will have had to install Git on your laptop.
Once SSH keys are all set for your computer, it is like having a free pass at the park. You can git push (upload) and git pull (download) anytime, anywhere, without entering a password each time.
We will need to Login to your source control account and open the git bash application to complete this session.
Open https://sc.unc.edu with a browser and login with your Onyen and Onyen password:
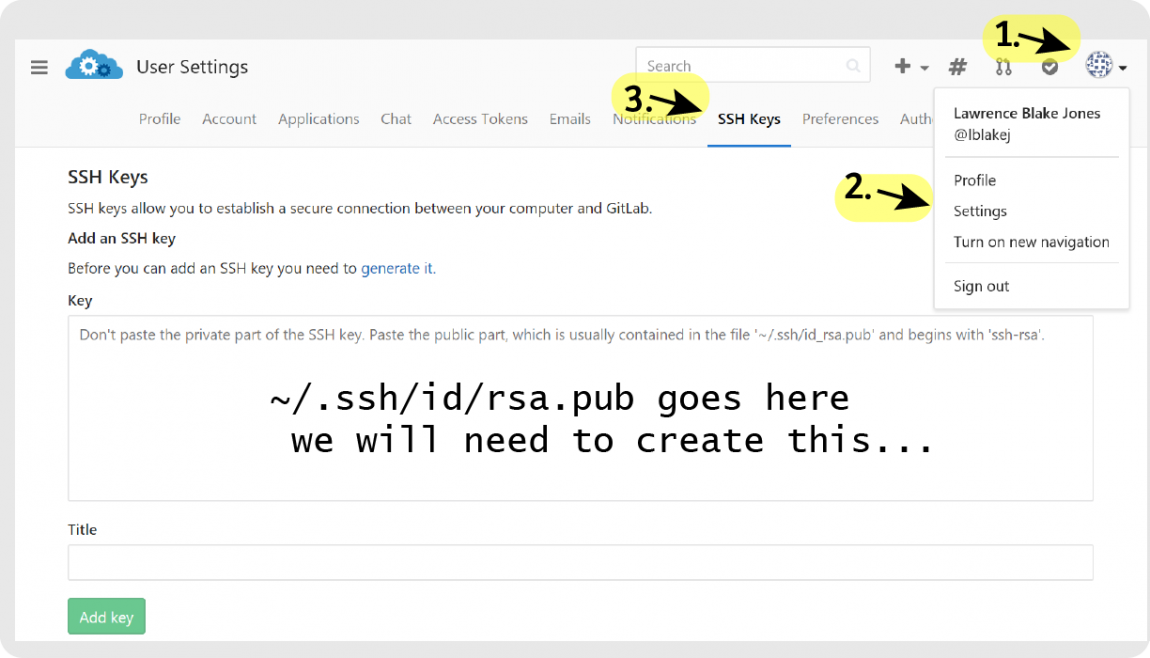
1. Accessing SSH Key input screen
See the below image for reference:
- Click the Avatar image,
- click settings, click
- SSH Keys
2. Set up public and private ssh keys on the class computer.
This is what we are working toward seeing on our desktops:
-
Log into the class computer with your Onyen and Onyen password
-
Next, go to the bottom left of the screen where it says "Type here to search" and type in
git bash
-
Launch git bash application when it appears.
-
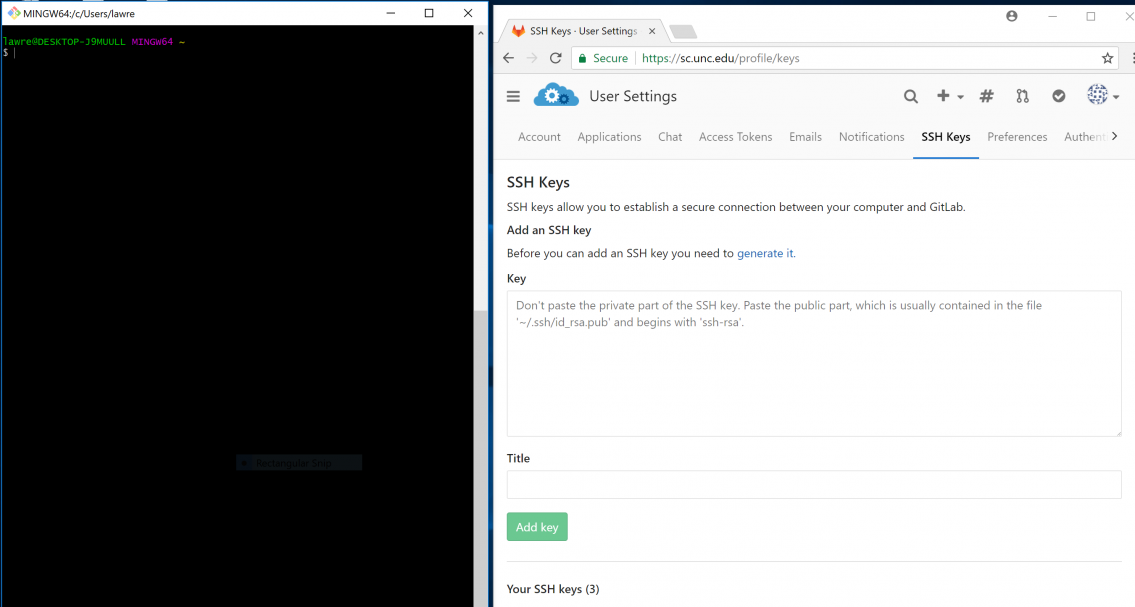
A terminal will appear showing a command prompt similar to this:
lblakej@DESKTOP-J9MULL MING64 ~ $
Set up the git bash screen on the left side of your screen.
You cannot break the in-class computers: every evening the entire system is wiped and restored.
Therefore...
The class-computer key is transient... it will vanish.
The class computer key that is generated is kind of like the electronic key that you get with a hotel room; its going to get "wiped" when you checkout (logout).
Which is what you want; you don't want someone else logging in and being able to use your key!
That is really not a problem because when you check back in, you can generate a new key and copy it back onto the source control site. So this is what you will have to do if your computer is in the shop for a week or two. It only take a few seconds to set the key up and you can download your files and then upload the changed files before you log out.
Obviously, this can get tedious over the long haul, so you are going to want to be able to set up a key-pair on your own computer—which won't get wiped—unless your hard drive crashes. But if that did happen, and your files were safely at source control, you could generate a new key on your new computer, copy them to the source control, and you would be in business again. If you have two laptops, you can put up two keys at source control. You can work on one or both of these systems and make sure that everything stays in sync.
If you are a bit intimidated by all of this source control lingo, I want to assure you that we are going to just wade into the ocean of git and linux and swim out just a little bit. Out of all of the source control settings, you really just need the ssh panel.
Let's Get Started with some bash commands to set up ssh...
After we finish this on the class computers, you will need to download git and set up ssh keys for you laptop.
PC Users can duplicate this on their laptops exactly as they have done on the class computer after they have downloaded git (which include git bash) for their laptops.
Mac users will also download git, but they will not need, or receive, git bash; they will use the terminal app that is included with Mac OSX. (The quickest way to launch terminal is to hit command + space bar which opens the Spotlight search, and then start typing "terminal").
Once you get the hang of working at the command line, setting up ssh is very quick task; it only requires two commands*:
ssh key-gento make the keys (this will prompt you for two items, but you can just pressenterfor both)cat ~/.ssh/id_rsa.pub | clipfor PC and
cat ~/.ssh/id_rsa.pub | pbcopyfor mac
*The tutorial will have a few more steps: we will move into the .ssh file, list the contents and run the cat command in isolation.
When you click on the tutorial slide show below, it will be added as a new tab in your browser. That way you can have the source control tab and the tutorial tab both in the browser on the right. You do not need the ssh input screen until the very end. After you copy the key in your clipboard, you can click the source control tab.
Click here: This tutorial is in html format, so it will launch in the browser in a new tab.
I have kept the navigation to a bare minimum so the images can fit in the entire browser window, so click on the image to cycle through the steps. You will go back to the beginning after the last slide. To close the window, just close the tab.
linux emulator: http://bellard.org/jslinux/ This is pretend. Nothing you create here is saved. Refresh your browser and it will disappear.
Client Class Review and Lesson Plan Notes for today
GitHub Practice
Best GitHub Cheat Sheet: all on one page, very clear
Awesome Links
- John Martin's Excellent List of Online Resources
John is a SILS PhD student. This list is from his Summer 2016 INLS161 website.
Command LineText Editing
We will take a quick look at command line editors
Text Processing
Markdown Editors
Learning Markdown is very easy. Spend some time here: https://www.markdowntutorial.com/
Editor I use on my PC laptop :
If you install this app, it will not install in your Apps folder. If you want to click on a .md file and have it open with Mark Down Edit, click on a .md file and when prompted to set up an app, navigate to the app in this directory:
c:\Users\yourusername\AppData\Local\MarkdownEdit\bin\mde.exe
Other PC options I have tried:
Mac
Create multiple files with Curly Braces Magic
We are not going to use OPAL, the SILS server this is left here for info purposes in case some one wants to set up an OPAL account.
(It is very similar to git bash and terminal, so you skills will transfer easily.)
Accessing Opal the SILS server
To login to OPAL with PC SSH client:
- Start your SSH terminal application.
- Select "Quick Connect", then enter opal.ils.unc.edu in the dialog box and enter your onyen.
- Accept and Save the host key, if requested. (This is the encryption key that lets ITS identify you).
- You will be prompted for your username (ONYEN) & password; provide them.
- Once there, you are in a shell session and thus into UNIX. The
$is the LINUX prompt.
To login to OPAL WITH Macintosh Terminal App:
- Hit command spacebar to launch Spotlight Search
- Start Typing "Terminal" hit enter when it pops into search window
- type
ssh *onyen@opal.ils.unc.edu then <enter>- *Replace
onyenand put in youronyen. - Example:
ssh smithj@opal.ils.unc.edu
- *Replace
- Accept and Save the host key, if requested. (This is the encryption key that lets ITS identify you).
- You will be prompted for your ONYEN password. Enter the password at the prompt
$is the Linux prompt
Slideshow on how to fork a repository from my GitHub account to the Opal Server
last page update: Wednesday Aug 30, 2017