
Markup that controls display of objects on a page
Use The Mysterious Affair at Styles by Agatha Christie to practice things today. Open it and save it as a document on your client. It has already been set up for formatting (the original source text is available online).
Suggestion:
Don't try to format your text before you type a document.
You will find it easier in the long run to simply type your document and then format it all at once after you have entered your text. We'll look at examples.
[top]
Breaks
Why might you want to insert page or section breaks?
A page break is pretty self explanatory - it causes the printer to generate a new page at the point of the break.
A section is a part of a document that has a specified number of columns and uses a common set of margins, page orientation, headers and footers, and sequence of page numbers. A section break thus will allow you to do different formatting in each section. This will be very useful when you combine it with headers and footers.
Types of breaks
![[MSWord 2013 break options]](images/markup.breaks.types.png)
The same is true in Word for Mac
![[MSWord 2013 break options]](images/markup.breaks.types.mac.png)
NEXT PAGE Word breaks the page at the section break. The new section starts on the next page. Use this section break if you want to apply different page numbers, headers and footers, orientation, vertical alignment, or paper size to the sections in the document.
CONTINUOUS Word inserts a section break and begins the new section on the same page. If the two sections have different settings for page size or orientation, the new section begins a new page even if you select Continuous. Use this section break if you want to have different column formatting or margins on the same page. If there are multiple columns in the previous section, Word balances the columns above the section break and then fills out the page with the new section.
ODD PAGE Word begins the new section on the next odd-numbered page. This section break is often used for chapters that begin on odd-numbered pages. NOTE: If the section break falls on an odd-numbered page, Word leaves the intervening even-numbered page blank.
EVEN PAGE Similar to Odd Page, but Word begins the new section on the next even-numbered page.
[top]
Headers and Footers
To quote Microsoft on it:
Headers and footers not only make your work look more professional; they prevent confusion and help readers to keep their bearings inside your document. Remember, people don't necessarily read a report or paper from front to back -- they flip ahead to the parts that interest them, and even extract and photocopy sections as it suits their needs. By setting Word to automatically add elements like page numbers, section titles, date, and author name, you ensure that each page bears the essential information that situates it within the whole of your document.
![[MSWord 2013 header ribbon]](images/markup.header.ribbon.png)
The same is true in Word for Mac
![[Word for Mac header ribbon]](images/markup.header.ribbon.mac.png)
Remember, you defined where this header and footer would be when you did page setup. You can now change it from the Header/Footer taskbar. You need to format the header/footer to suit your document (influenced by themes). Make the header look like what you want it to look like by using table borders and fills to add color and distinction.
Because you have sections, you can format headers by section and have them display in conjunction with the needs of the document's section.
[top]
Presentational Elements
Styles are a form of CSS
Use the styles sidebar to see the styles in use in the document or all the ways you have to format text within this document. You can create new styles or modify existing styles. Once the style is applied, it will remain constant unless you modify it again
![[Word 2013 styles sidebar]](images/markup.styles.sidebar.png)
The same is true in Word for Mac
![[Word 2013 styles sidebar]](images/markup.styles.sidebar.mac.png)
You can directly access styles from the home ribbon.
[top]
The key thing about Styles
They mark up your text so that you can use tools to find, manipulate, or operate with them.
They may make the object look different, or they may just make its properties behave differently. Your styles sidebar is the tool to use to change your style properties, just as you might have done when you modified a style in your CSS sheet.
[top]
Styles and their uses
The styles and formatting sidebar allows you to control and modify all the styles in your document
![[MSWord 2013 styles properties sidebar]](images/markup.styles.sidebar.02.png)
When you make changes in the sidebar, you can make changes to your Style Sheet that affect all instances of the style. You can thus make document level style modifications. However, you can also apply the style changes only to one instance of the style in the document, and thus make a line level style modification.
[top]
Templates
Templates set up a document for you, allowing you to place your text into the pre-set locations already formatted for style
They can be useful and can be modified to suit your particular needs. Every document you create in MSWord is based on some template (usually normal.dot) and every template has an associated document-level stylesheet incorporated in it. You can change any or all of the styles in any template by using your style tools and you can create templates tailored to your needs.
[top]
Themes
... shows you the various groups of styles you can apply to your document, but is primarily to set the style for a Word-created web page.
![[Word2013 themes dialog box]](images/markup.themes.dialog.01.png)
![[Word2013 themes color dialog box]](images/markup.themes.dialog.02.png)
The same is true in Word for Mac
![[Word2013 themes dialog box]](images/markup.themes.dialog.mac.png)
Suggestion:
Select a theme that fits most of your needs and aesthetic preferences, and then modify the individual styles in the theme to custom-tailor it to your particular look.
This will be akin to the modification you did in CSS.
Styles and templates apply CSS-like presentation layer instructions to any structural layer object contained in the document. Those objects include, among others, things such as
[top]
Other objects
- paragraph objects - how the text relates to the page and to other paragraph objects
- font objects - how the letters look
One may, however, deal individually with the paragraph object and with the font object, either as a single object with a single set of properties or as individual objects, each with individual sets of properties.
Paragraph formatting
You may define the formatting of a paragraph within a style (a form of a document level style declaration), or you may define it in terms of a particular paragraph (a form of an inline style declaration).
Indents and Spacing
Control how each paragraph behaves.
![[Word2007 paragraph formatting dialog box]](images/markup.paragraph-formatting.MSWord.2007.png)
The same is true in Word for Mac
![[Word2013 paragraph formatting dialog box]](images/markup.paragraph-formatting.mac.png)
Alignment
One could use the formatting task bar, but this makes everything behave the same.
Outline level
If you want to use the outline tool, but don't want to change the look of the levels in use.
Indentation
Control the shape of the space in which the paragraph displays.
Spacing
control the separation between lines and between blocks of text. Automatic is useful.
Tabs
Another way to reach the tab control box. Define how you want your tabs to behave.
Line and Page Breaks
This can cause some stress.
[top]
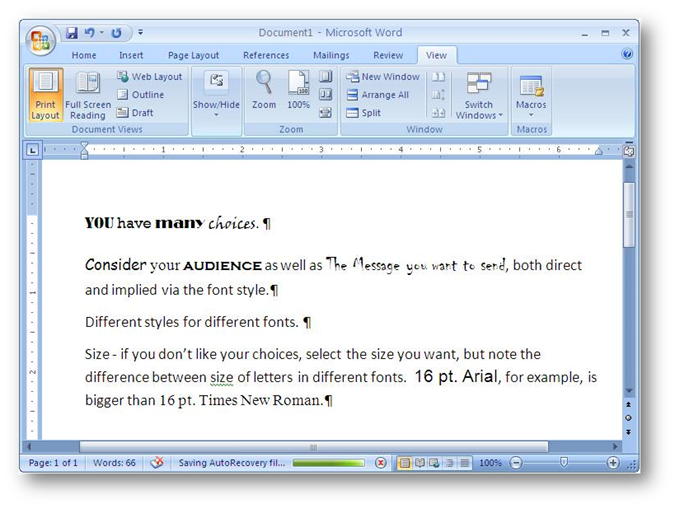
Text formatting - Fonts
The choice of fonts is up to the document creator, but there are some thoughts to consider.
According to Ellen Lupton's Type on screen : a guide for designers, developers, writers, and students,
Choosing typefaces can be a bewildering task. Understanding how the proportions of letters affect their visual impact and knowing how a type design fits into the broader history of typography can help. Many of the typefaces we use today are based on designs produced hundreds of years ago. Classical serif faces, introduced in the fifteenth century, imitated older media - handwriting and stone carving. In the nineteenth century, printers devised simpler, bolder sans serif forms to meet the needs of commercial advertizing.
![[Word2013 fonts dialog box]](images/markup.fonts.dialog.png)
The same is true in Word for Mac
![[Word2013 fonts dialog box]](images/markup.fonts.dialog.mac.png)
![[example from W3Schools showing difference between serif and sans serif fonts]](images/markup.fonts.serif.gif)
You may hear that serif fonts are more readable than sans serif fonts. That may not be a valid scientific assessment.
A recent book on fonts and typefaces suggests two reasonable perspectives:
Read the text and decide what tone needs to be achieved. (p.65)
The which-is-better argument continues chiefly because there have been no conclusive studies measuring which one we find more legible. For this reason, opinions continue to be based on subjective observation and, perhaps most often, personal taste. (p. 66)
There are no stone-set rules - just keep it logical. (p.196)
Color
Customize as needed.
Underline
select underline from the formatting panel, or via the CTRL+U keyboard shortcut, but here is where you define the underline style.
Effects
strikethrough is better handled with Track Changes tool (in MSWord).
Superscript and subscript are useful for math work.
Shadow, Outline, Emboss, and Engrave are not too useful in print, but very useful for web applications.
Hidden text is tricky.
Default
Can change the built-in standard. Be careful.
Character Spacing
Useful for making things fit in a defined or confined space.
Text Effects
Not too useful for print, but may have some utility if you are sharing electronic versions of documents.
![[Word2013 font dialog box]](images/markup.fonts.dialog.MSWord.2013.02.png)
[top]
Symbols (special font sets)
![[OpenOffice Writer special characters/symbols dialog box]](images/markup.symbols.OOWriter.png)
Useful for creating attentional focus or for adding non-English Çhä®âctérß to your text. Try with dropped cap for dramatic paragraph openings. If you are going to use a lot of them, create your own keyboard shortcuts.
Drop Cap
A way to put some polish into your output.
![[drop cap example]](images/markup.drop-cap.png)
[top]
Special formatting
Borders and Shading
Useful for highlighting selected parts of text or for special purposes such as funeral notices or condolence letters.
![[OpenOffice Writer borders dialog box]](images/markup.borders.shading.OOWriter.png)
Columns
A way to format all at once. More useful for publishing than for normal documents.
Change case
Use the ? feature to understand your options.
![[MSWord change case choices]](images/markup.change-case.gif)
The same is true in Word for Mac
![[MSWord change case choices]](images/markup.change-case.mac.png)
[top]
Page numbering
If you use headers and footers,
you can do numbering as part of those sections.
![[MSWord 2013 page numbering dialog box]](images/markup.page-numbering.01.png)
The same is true in Word for Mac
![[MSWord 2013 page numbering dialog box]](images/markup.page-numbering.mac.png)
If you do not, this will create headers and footers with page numbers for you
Format including chapter numbers involves text formatting.
![[MSWord 2010 page number format dialog box]](images/markup.page-numbering.dialog.png)
Page numbering done from the standard toolbar can end up fighting with page numbering done from the footer toolbar, so it's a good idea to decide which tool you want to use to number your pages.
[top]
Footnotes
Choose either a footnote or an endnote and customize how they will display.
![[MSWord 2013 footnote ribbon]](images/markup.footnote.01.png)
The same is true in Word for Mac
![[MSWord 2013 footnote ribbon]](images/markup.footnote.mac.png)
Use Draft view to see footnotes/endnotes as you work with text.
![[MSWord 2013 drAft view with footnotes displayed]](images/markup.footnote.02.png)
Use the browse tool on lower right corner of screen to browse the document by footnote/endnote.
Moving cursor over footnote reference in text brings up the footnote in a bubble window. Footnotes move with their mark in the text
[top]
Other resources
[top]