Working with images
Images can add a lot to your web pages. Consider using individual images as hyperlinks. Consider the utility of multiple hyperlinks on an images map as a navigational tool.
Image tags
You put images in a web page using the img element. For example, if you include this image tag in your page
< img
src="../../../images/tasks/task02.website/GEB.png" />
![[Goedel Escher Bach]](../../../images/tasks/task02.website/GEB.png)
then the image displayed on this page will be displayed on your page when you load the page. (But only if you have the image stored at the same relative location from the page as it is stored from this particular web page)
In the general case, the img element can have a number of attributes though the above example only has a single one, src. In this case, the src attribute is required -- it doesn't make sense to have an img tag without specifying which image.
The img tag can take any or all of the following as attributes:
- border Specifies border around the image, in pixels
- align Alignment of image with surrounding text ("bottom", "left", "top", "middle", "right")
- alt Alternate text to be displayed if image is not loaded
- width Width of image in pixels
- height Height of image in pixels
So the img tag (with an absolute, not relative, location this time)
<img
border="10"
align="middle"
alt="[Goedel Escher Bach]"
width="301"
height="349"
src="http://www.ils.unc.edu/courses/2013_spring/INLS261_001/images/tasks/task02.website/GEB.png"
/>
says
Display the specified image
with a 10 pixel border,
align it in the middle of it is embedded within,
use '[Goedel Escher Bach]' as the alternate text if the image is not or cannot be displayed.
display it with a width of 301 pixels
display it with a height of 349 pixels
Find the source of the image at the location specified after the = sign
[top]
Images as hyperlinks
To make an image into a hyperlink, embed the img tag inside the hypertext anchor
<a href="http://www.unc.edu/">
<img
border="10"
align="middle"
alt="[Goedel Escher Bach] "
src="http://www.ils.unc.edu/courses/2013_spring/inls261_001/images/tasks/task02.website/GEB.png"
/>
</a>
Now when you click on the image it will take you to the UNC homepage.
[top]
Image Maps
Image maps are "clickable images". They allow you to specify which URL should be accessed when a user clicks on a part of an image. For example, if you have a state map and want to bring up information about selected counties when a user clicks on the shape of the county, then you can do so by defining a geometric shape around a county and associating the coordinates of that shape with a URL of your choosing - in this case, a county information page. This is a very powerful tool and gives you a lot of flexibility in how you design your pages. It's a step towards dynamic-content as well.
There are two dimensions to image map creation.
- First, image maps can be client-side or server-side
- A client-side image map contains all of the shape information and associated URLs in an HTML document, usually the same document that contains the image. They run more quickly because the client has all the information it needs to work.
- On the other hand, a server-side map contains all of this information on the server in a place completely separate from the file containing the image. The terms client-side and server-side simply refer to where the "click" coordinates are interpreted and translated into a corresponding URL - on the client or on the server. Server-side image maps require you to do the creation work on the server.
-
The second, more practical dimension of image map creation, is how to actually create one,
in this case a client-side image map.
- You can create a map by hand using any of a number of free applications, a program like DreamWeaver or Photoshop to determine the shape coordinates, or you can use a program specifically designed to do image map creation.
- ITS offers some help if you wish to use Dreamweaver to create an Image Map
[top]
An Example
Here is a simple example of the HTML code for a client-side image map. Looking at the code, we see the instructions shown below on this page.
<h2>North Carolina
<map name=" FPMap0">
< area
href="counties/Brunswick.htm"
shape="circle" coords="375, 189, 18">
< area
href="counties/Columbus.htm"
shape="circle" coords="348, 175, 18">
< area
href="counties/NewHanover.htm"
shape="circle" coords="399, 177, 15">
[we skipped many lines of code here]
< area
href="counties/Jones.htm"
shape="polygon" coords="408, 123, 417, 104, 440, 112, 440, 137, 412, 121";>
</map>
<img
border ="0"
src ="../images/NorthCarolina/NCcounties.gif"
width ="537"
height ="218"
usemap ="#FPMap0"
alt ="map of North Carolina's 100 counties" />
</h2>
Components of the image map.
- The "usemap" attribute of the img element says " this is a client-side image map".
- The map shapes and coordinates are in a map element called "FPMap0".
- The map element shows two separate shapes (circle and polygon), each of which refers to a different file, designated by its relative location in the file structure.
[top]
Creating our own map
We will create an image map web page in which we will use an image as a navigation feature. Our goal is to use the top image as a visual way to find things.
- For this example, we'll use Dreamweaver, though you may use any program you prefer.
- then, using a browser, open this file
- then view its source code and copy it all
- then paste that source code into the code tab on the page you have open in Dreamweaver. Toggle back to the design tab and you can see the page you will work with.
- save it as imagemap01.htm
-
But we need two more pages, so go through the same procedure with a
second page and a
third page.
You will then have three pages to work with.
- save the second page as imagemap02.htm and the third as imagemap03.htm
-
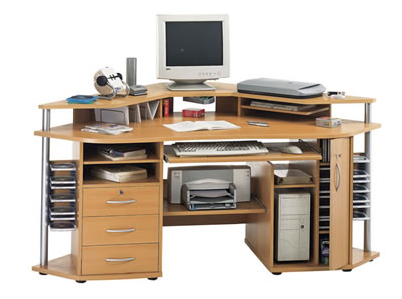
We need to add an image. In this case, let's use this
image of a workspace.
- open it, then copy image location.
- insert the image it into your new first page, replacing the words "(placeholder for picture)" by using the copied image location as the URL in the Insert Image dialog box in Dreamweaver.
- Now on page 1, select the image and, using the Rectangular Hotspot button on the pictures toolbar, place a rectangle around the top drawer on the left side of the image. You will get a hyperlink dialog box. Link the hotspot to page 2.
- Again on page 1, select the image and, using the Polygon Hotspot button, place a polygon around the top two CDs in the CD tower on the left side of the image. Link the polygon hotspot to page 3.
-
Again, and finally, on page 1, select the image and, using the Circular Hotspot button,
place a circular hotspot around the keyboard.
- The circle is tricky, so place your cursor in the middle of the keyboard and drag out the circle as wide as you want it.
- Link the circle to the Microsoft's shortcut page.
- Check it out. Go to File > Preview in Browser to look at the page in a browser. Click on your hotspots and see where they take you.
So, this image map was created by Dreamweaver, but displays in Explorer, Mozilla, Opera, and almost all other browsers. The image map is defined by a shape mapped onto an image. The map defines the browser's action when the user clicks within the shape, in this case causing a new html file to open.
[top]
Compare the html on your image map pages with the html on the North Carolina map example
Note the similarities
- an HTML file that contains an img tag with a usemap attribute,
- an image file that is the src (source) of the img (image),
- a target location associated with clicking on the mapped area of the image.
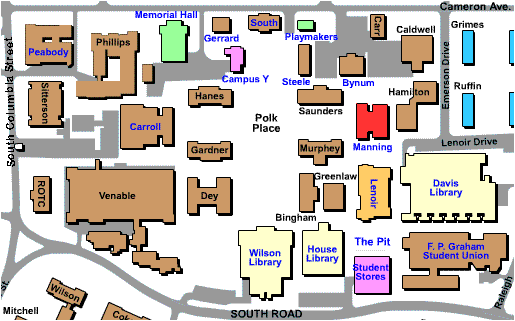
Image maps can be very effective ways to provide navigation tools to the user. Try another one using a real map and images
- UNC Map - navigate to SILS with a circular hotspot around Manning Hall
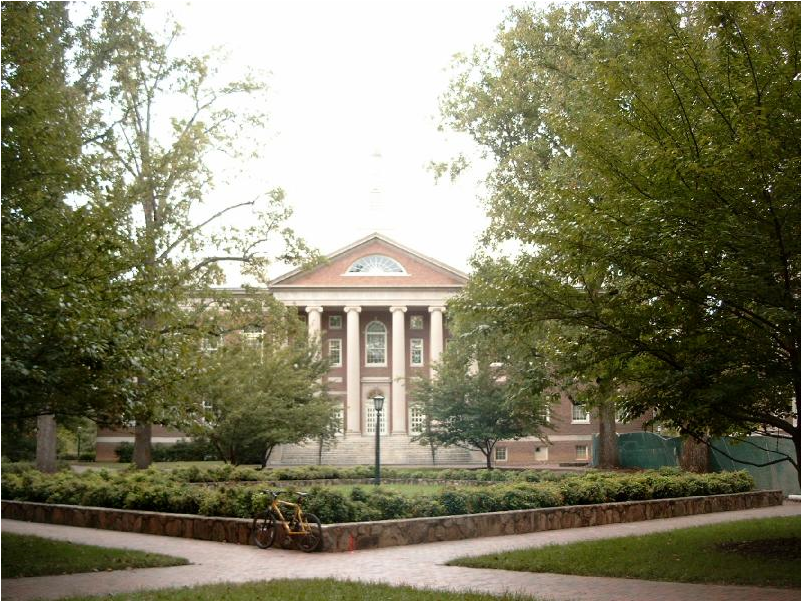
- Manning Hall - navigate to the computer lab with a rectangular hotspot around the front door.
You can use some editors to create image maps or online tools such as image-maps.com.
[top]