04 Oct 2018
Class Schedule
21 Aug | intro
23 Aug | clients
28 Aug | servers
30 Aug | networks
04 Sep | basics lab
06 Sep | structural layer
11 Sep | presentational layer
18 Sep | working with layers
20 Sep | behavior layer
25 Sep | images & design
27 Sep | website lab
02 Oct | object layers
04 Oct | graphics |
tools that read markup |
practice exercises |
next session
09 Oct | document markup lab
11 Oct | spreadsheets, formulas & functions
16 Oct | data display
18 Oct | Fall Break
23 Oct | database tools
25 Oct | spreadsheets lab
30 Oct | relational databases
01 Nov | tables
06 Nov | relationships
08 Nov | input & output
13 Nov | SQL
15 Nov | complex queries
20 Nov | databases lab
22 Nov | Thanksgiving
27 Nov | presentation design
29 Nov | presentation delivery
04 Dec | presentation lab
13 Dec | 0800-1100 | final in class presentation

This work
is licensed under a
Creative Commons Attribution-NonCommercial-ShareAlike 3.0 Unported License.
home & schedule | class blog | syllabus | contact | grades
You don't have to create an index for task 03, but it wouldn't hurt to know how to do it.
A table of contents, however, is a requirement.
Practice with these examples
Use this document, Two Years Before The Mast by Richard Henry Dana, to practice the tools we discussed today.
back to top
Adding graphics to your document
Let's add an image of the author to the title page. Use this image of Dana (as he is supposed to have looked during the time he was a sailor.) Copy the image and past it in right after the author's name on the title page.
![[MSWord 2007 drawing tools]](images/markup.add-graphics.png)
Did it work out as you wanted it to?
- Does the page look correct?
- If it looks amiss, is there a reason why?
Note that the image appeared where we told it to appear - as a text object immediately after the final letter in Dana and immediately before the end of paragraph markup. Let's correct that by placing the image on a new line by itself - enter a new paragraph break immediately prior to the image object. Look at the new page in the Print Preview View to see if this is how we want it to look.
That image was formatted as if it were a text object - its wrapping was in line with text.
- Let's now place a new graphic in a different location in the document.
- Using your cntl+f tool, locate the third time the name of Dana's ship, the Pilgrim, is mentioned in the document. It should be somewhere in Chapter XII.
-
Then copy
this image
and paste it into the document at the end of the paragraph where you found the name of the ship.
- This time, however, we want the text to flow around the image.
- So right click on the image object and format it.
- First change its size to 80% of the original.
- Then lay it out square with a horizontal alignment of right.
- How does that look in the Print Preview?
back to top
Let's try another type of wrapping
Use your cntl+f tool to find the first instance of the word "Asitka". It should be in Chap. XXVI. Immediately before the word "Asitka" insert a five pointed star from the AutoShapes part of the drawing toolbar.
- What was the default wrapping that came with this object?
- Was it the same as the wrapping property that came with the image of Dana?
Right click on the star to format the object.
- Make the size 2 inches by 2 inches.
- Give it a fill color of Red with a black, 4 point line around it.
- Then wrap the text around the star tightly with text wrapping on both sides (you will have to do advanced layout).
- Finally, center the star in the paragraph object.
![[MSWord 2007 format object]](images/markup.shapes.png)
[top]
back to top
Let's group some objects
First, go to the start of the first paragraph in Chap. XXXIV. At that point, insert this map.
- Format it to wrap top and bottom (again, this will require advanced wrapping) and select its horizontal alignment to center.
- Now, using your drawing toolbar again, select an oval shape and place the oval directly over the words "Cape Horn" in the map image.
- Format the oval to be .5 inches high and .75 inches wide.
- Select the no fill option and make the line red, 4.5 points.
You now have two objects in the same location.
- But we want to deal with them as a single object.
- Can you group them together without having first used a Drawing Canvas?
- Can you even group them together in a Drawing Canvas?
![[MSWord 2007 group objects]](images/markup.grouping.map.circle.png)
back to top
Using the Index tool
You have some text formatted as Heading 3 called Index at the end of the document.
- Go to that location and generate a new line of text below the word index.
- Be sure that the new paragraph object is formatted as Normal style.
- We want to insert an Index, so open the Index dialog box from the taskbar.
- Our index will be a two column affair.
![[find dialog box]](images/markup.find-Monterey.png)
For the Index tool to work, it must read marked up text.
- Where it finds such text, it will register the page number and add the name of the marked up text plus the associated page numbers in the index.
- So select the Mark Entry button.
This will reveal the Mark Index Entry dialog box.
![[mark index entry dialog box]](images/markup.mark-index.Monterey.png)
- Of course, we may not know exactly where the words we want to index are located so we want to open the cntl+f tool simultaneously and enter the word we wish to index, then find the next example of it.
- Once we have found an example, we need to click in the Main entry box on the Mark Index Entry dialog box and then ask the tool to Mark All the examples of that word.
Try it with these words - Los Angeles, San Francisco, San Diego, Santa Barbara, Monterey, Boston, and Cape Horn.
- You will note that the Mark Index Entry tool adds some hidden text to the document.
- You will not see this text when the document prints, but you can see it when you have the Show/Hide button selected.
- This is the markup the index tool is looking for.
![[MSWord 2007 marked text for index]](images/markup.marked-entry.png)
Now that you have your document marked up for the index tool, create an index.
- The first thing you need to do is to be sure where your cursor is located because the index tool will place the index where the cursor is located.
- Place your cursor at the location of the new paragraph object you created after the word Index, and create an index by selecting the OK button on the Index and Tables dialog box.
![[a completed index]](images/markup.index.finished.png)
back to top
Tables of Contents
Now we need to wrap it up with a table of contents. Again here, the table of contents tool looks for markup in the document and uses the markup it sees. The index tool looked for words we marked up. The table of contents tool looks for styles we have incorporated into the document.
So, now we create a table of contents.
- As with the index tool, the table of contents tool places the object it creates in the location where the cursor is located.
- So move the cursor to the words "Table of Contents" located on page 3.
- Generate a new paragraph object below the words "Table of Contents."
- Generate a table of contents using only objects formatted at Heading 1 or Heading 2. You may have to use the options button to clear other formatting out of the way.
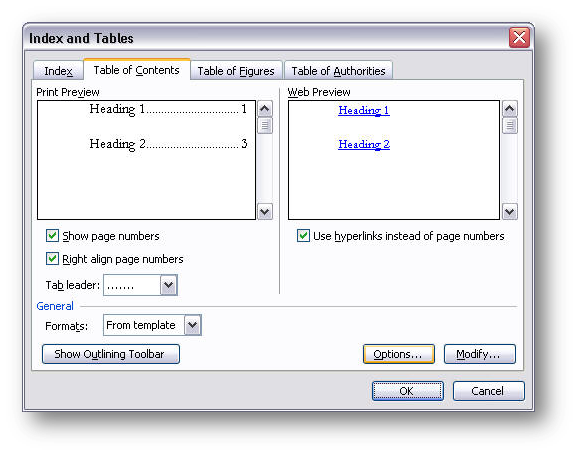
Select the OK button and your table of contents is created and installed. But is this what we really want?
- We had formatted the chapter numbers as heading 1 and the chapter introductions as heading 2.
- Do we want both in the table of contents?
- Assuming we don't, can we now make a simple adjustment?
- Yes, we can, but we need to make a new table of contents.
- Select the table of contents object by clicking on any portion of it and selecting all of it and delete the table of contents object we just created.
![[a completed ToC]](images/markup.ToC.final.png)
Run the table of contents tool again, but this time have it display only one level, only the parts of the document formatted as heading 1. In other words, have the table of contents tool read all the objects formatted as heading 1 and display the name of the object and its location in the document in the table of contents.
back to top
Final steps
Are we done? Did the introduction of a table of contents throw off the page numbering?
- Since the table of contents is at least two pages long, the document is at least two pages longer.
- Thus the index we created is now no longer accurate since it was based on the shorter document.
- We can fix that by going back to the index and selecting the index object.
- Then right click on the selected object and update the field.
![[update the index]](images/markup.update-field.png)
If the pages need renumbering, the update will renumber them. Did any of them need renumbering?